

How I Program
“We aren’t arbitrarily stacking one program on top of the next; we’re building out structured approaches to training that continuously map onto your specific rate of adaptation across time, interests, and objectives.”
Several weeks ago, I wrote an article purposefully titled “The Death of Periodization.” A week after, I followed it up with a slightly more existential piece on how I view training on a philosophical level. Then, because people kept asking why we did it in the first place, I wrote a third article explaining the thought process
I remember, as a young strength coach, reading training philosophy-type stuff and always wanting to know more about how those kinds of coaches actually programmed. Like…all of the deep stuff was great, but what did it mean for Monday’s workout? Or Tuesday? Or any day, for that matter?
With that in mind, I wanted to follow up these brainy “think pieces” with a deeper dive into how I practically write programs. It’s easy to throw a critique of periodization on LinkedIn, or engage in debates about how coaches get training wrong, but I think I owe it to the people to put my money where my mouth is and give some nuts-and-bolts guidance on how I build a training plan for an athlete.
So come closer. I have no idea how long this article is going to be…
Background Context
I’ve been writing programs this way for probably 10-12 years. Truthfully, I couldn’t even tell you the last time I prepared a periodized, “%1RM,” classic training program. What you’re about to see is the culmination of a lot of fiddling, experimentation, wrong answers, and more than a few successes. This approach has worked in 1:1 settings for folks training for the highest levels of military selection, and it’s also formed the backbone of how I treat large-group training with something like Long and Strong. Lately, I’ve been tinkering with it even more to see how far we can push the limits of large-group autonomy and individualization. But more on that later.
This approach has also informed a lot of the content we’ve put out on the blog over the years, including the Lethality Matrix, our approach to endurance work, and, of course, our fundamental truths of tactical training.
The point is, this works. And I know it works.
It’s different from your standard Strength and Conditioning education, but that’s exactly the point. The Tactical Athlete is a fundamentally different training paradigm than the Sport Athlete.
It’s not that we need to find ways of adapting the Sport model to the military setting - we need to come up with an entirely new model. This is my version of that model.
Overview
There are a few key concepts here to keep in mind as you read through this:
This is an “emergent” style of programming, which is to say that we start at Day 1 and allow the athlete’s responses to inform how we progress from one phase to the next
This is NOT periodized. I hold Periodization to mean “the prospective organization of training into phases based on assumptions about how adaptations will develop over time.” I make no assumptions here about the rate at which athletes will adapt, nor do I try to program sessions weeks in advance thinking that the athlete will be prepared to do that specific prescription on that specific day.
We navigate alongside the athlete; we do not forecast ahead of them. Of course, we might have dates on the calendar that have objective performance metrics we need to hit, but how we get there is entirely dependent upon the athlete’s rate of adaptation as well as their personal preferences. I will never assume that an athlete can hit “3×5 @ 85% 1RM” seventeen Tuesdays from now. You shouldn’t either.
Constraints-Based Programming
This deserves its own write-up, but for now I’ll just give a quick overview. I program almost exclusively using constraints. Instead of hard-and-fast prescriptions that an athlete needs to hit on each training day (i.e. 3×5 @ 85% 1RM), I give them an auto-regulated range that allows for some flexibility and fluidity based on readiness, choice, and intent. For example, the aforementioned prescription might become 3×3-5 @ RPE 8. The rep range allows for some maneuverability, and the RPE maps to their readiness on the day. The same method can be used for endurance training, which you’ll see below.
It’s important to note that these constraints form the backbone of how we navigate the Periodization versus Planning debate.
When you use constraints, every single training session becomes a feedback tool that you can use to dictate future performances, not just a standard that you’re hoping they’ll hit on the day. If, for example, the athlete hits 3 sets at the lower end of the 3-5 rep range without exceeding the RPE for the day, I know that the goal for the subsequent exposure (i.e. the next week or whatever) is to try and use that same weight for a few more reps.
When you limit your prescription to something as basic as 3×5 @ 85%, the only information you collect is whether the athlete CAN or CAN’T.
How I Actually Write Programs
Step 1: Athlete Overview
This first step is no different from any other approach. I meet with the athlete and gain an understanding of their training history, goals, timelines, and any relevant dates on the calendar that we need to prepare for. The biggest difference is probably the way in which I have this conversation with them. I’m interested in all of the above, but I also want to know what motivates them. What’s their “why”? What do they like and not like? For lack of a better term, it’s much more of a “first date” conversation than a “let me write workouts for you” discussion. This establishes buy-in early on and also sets the expectation that I have for all of my athletes, which is that they are going to play as big a role in the training design process as I am. This isn’t just tongue-in-cheek…I’m saying this because it’s their objective and subjective experience that is going to drive training decisions, not my cleanly designed Excel spreadsheet.
To be fair, I think most good coaches probably do this. The difference, perhaps, is that last part: the understanding that the athlete’s feedback is going to be the primary driver of the program. This is probably the biggest change for most athletes that encounter this style of programming. They’re used to being handed a plan and just doing what’s on the paper. When working with me, I’m expecting reps, weights, RPEs, paces…but I’m also expecting a subjective, narrative overview of the session and how it felt.
What’s most interesting here is that, after a few phases, I start to notice most of my athletes changing the tone of their training notes. Instead of speaking to me, they start speaking to their future self…telling their future self what weights to hit, when to repeat certain intensities, etc. It’s subtle, but it’s an early indicator that they’re buying into the athlete-centric design concept.
Step 2: Design the Template
I write programs in what I call “phases,” which, for planning purposes, is basically a week. That’s not a law - you can have shorter or longer phases, if you like - but understand that the further out you start to project, the less navigating you’re doing and the more forecasting you’re starting to get into. This is, again, a key point in the debate against traditional periodization. The further out you begin to forecast training adaptations, and the more rigidity and confidence you begin to apply to those forecasts, the less aligned you are with how the athlete is actually adapting to training stimuli.
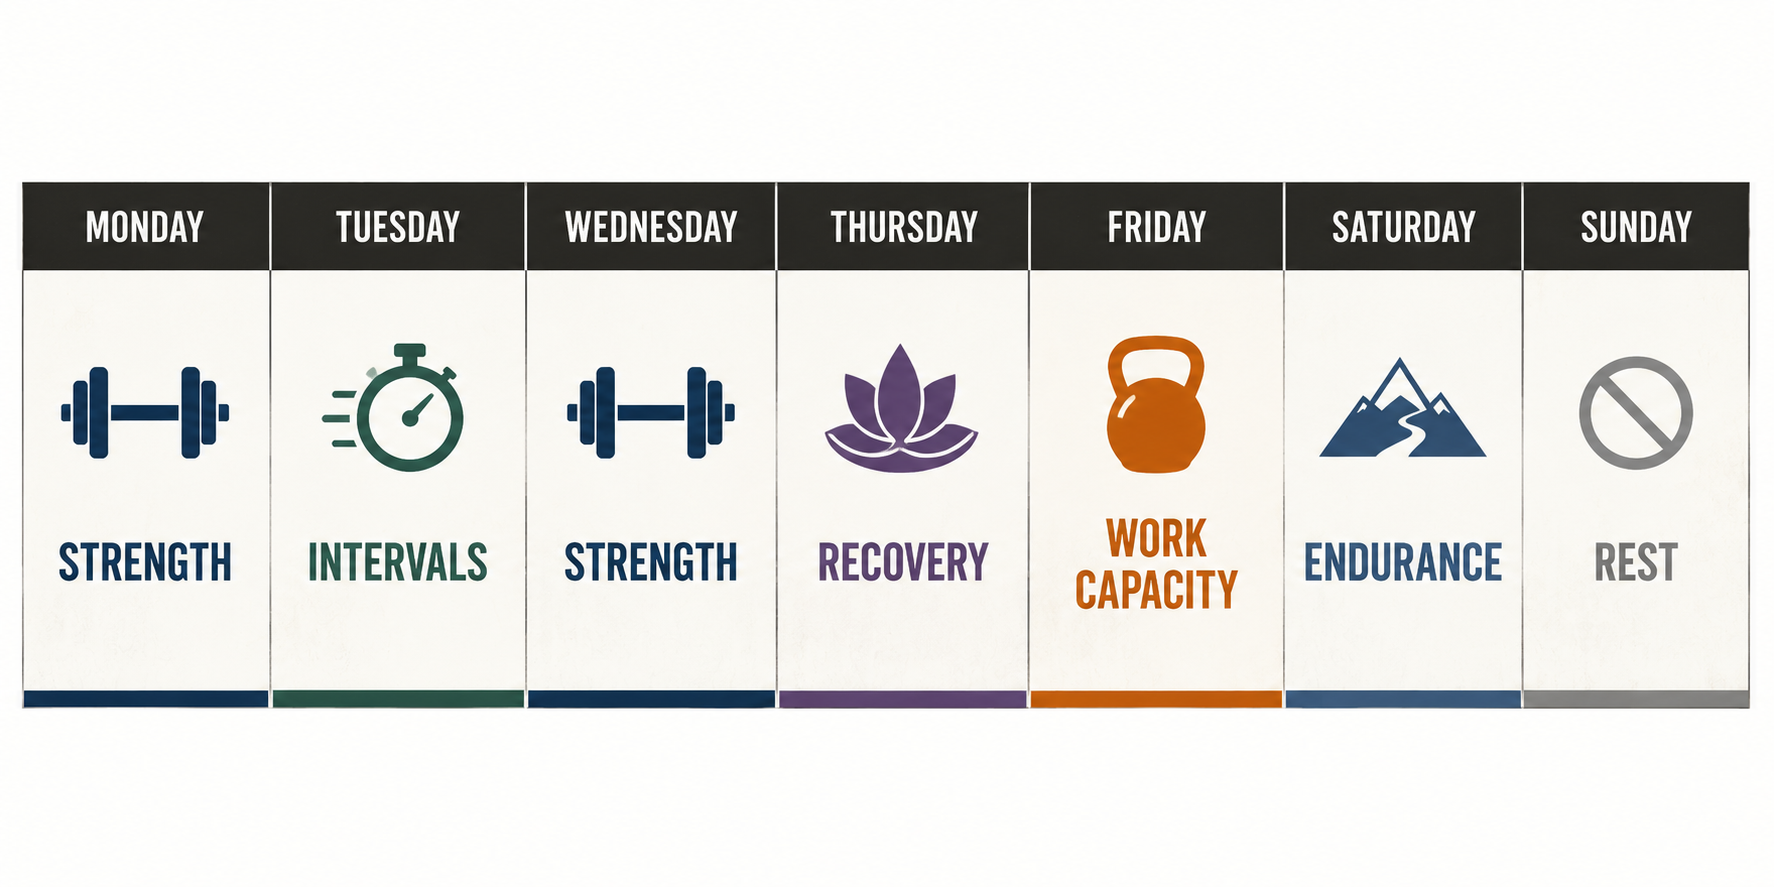
The visual above gives a sense of what a standard phase might look like. In future CEU content, I’ll take you deeper into the weeds on some of these, but for the purposes of this article, I wanted to work off of a basic, “hybrid”, concurrent training template. Nothing is especially biased over anything else, and an athlete could easily stick with this type of layout for months and months. In fact, I have one individual that I have worked with continuously for over 5 years. He has followed this exact same layout the entire time.
Now, obviously the layout needs to suit your athlete’s schedule. In the example above, I have the higher-volume endurance work on the weekend because for most athletes, the weekend is when they have the time/freedom to execute multi-hour efforts (if necessary). That isn’t always the case. For athletes who have wonky schedules or other competing demands (like shift work), you may need to shuffle things around a bit such that the higher-volume work takes place somewhere else in the week. This is where logic and critical thinking must be applied.
Step 3: Consolidate Your Stressors
This isn’t a standalone step so much as it is a concept that gets applied as part of the initial design process. As we look to lay out our initial template in a manner that suits our athlete’s schedule, we want to be mindful of the fact that, in this setting, we’re often balancing competing physiological demands. For example, tactical athletes need to be able to move long distances AND lift heavy weights in a manner that isn’t duplicated anywhere else in either team or individual sport.
Instead of distributing these stressors randomly throughout the week, or trying to stick to questionable training residuals, I leverage a concept proposed by Alex Viada called “consolidation of stressors.”
The overarching idea is that the body really only understands muscle tension and bioenergetics…how the muscles need to move, and how they are fueled to move in that way. From that perspective, there isn’t much of a difference between something like a sprint and a back squat (high tension, similar energetics), so it behooves us to put those similar stressors close together on a training calendar. The alternative, which is popular in some older training models, is to try to disperse like stressors throughout the week or block. The issue with this approach, as I see it, is that you end up with an athlete who is constantly sore and overworked. Just as they recover from the squats, for example, we hit them again with speed work that targets the same general area with the same general type of stress.
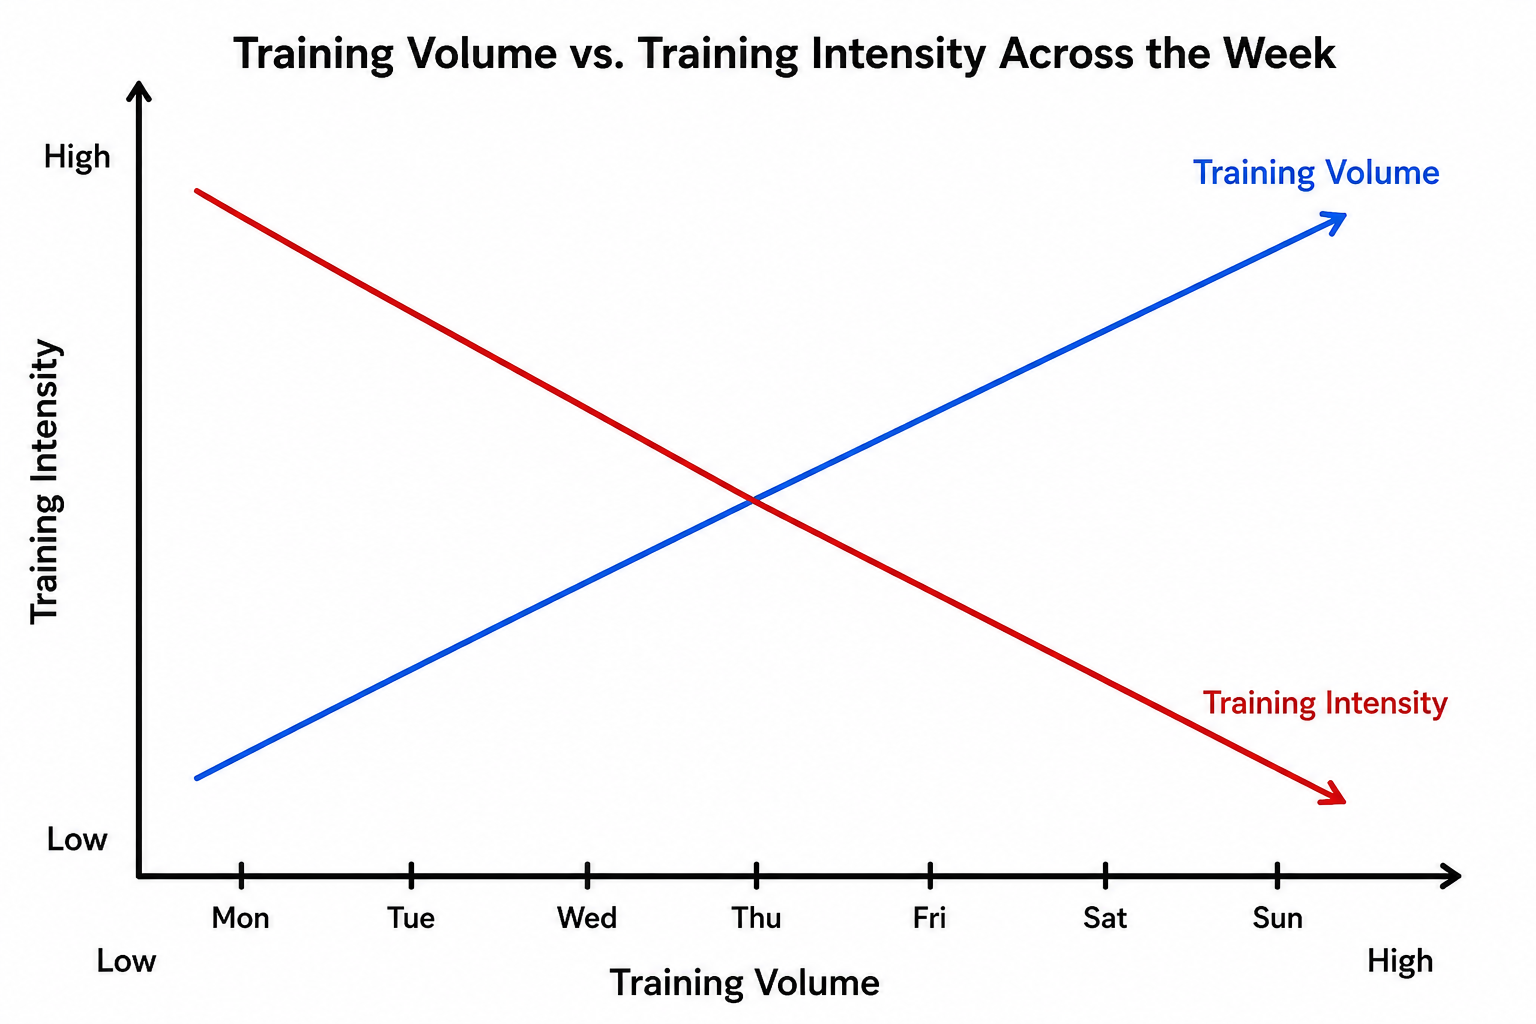
The visual above provides a simple graphic representation of what I mean. Early in the week, when motivation is high, we tend to default to higher intensity, lower volume work (heavy legs, hard sprints, etc.). Towards the weekend, as schedules generally start to free up, we can get away with higher volume, lower intensity work (long aerobic efforts, rucks, etc). Notice that I’m being liberal with my use of words like “generally” and “tend to.” These are nothing more than rules of thumb, not laws that we must always be beholden to.
Remember: pay attention to the athlete and how they are responding. Adjust accordingly.
Step 4: Rank Your Priorities
This is probably the most critical step in the design process, because it ends up informing the shape that your phase layout takes. If we refer back to Step 2, we set up a pretty standard design for a hybrid athlete looking to capitalize on both strength and endurance in equal measure.
Now, what if we move towards a date on the calendar that requires a bit more aerobic depth than what that template presents? Not a problem. If it’s a more immediate need, we can drop a strength session entirely and add in some additional endurance work.
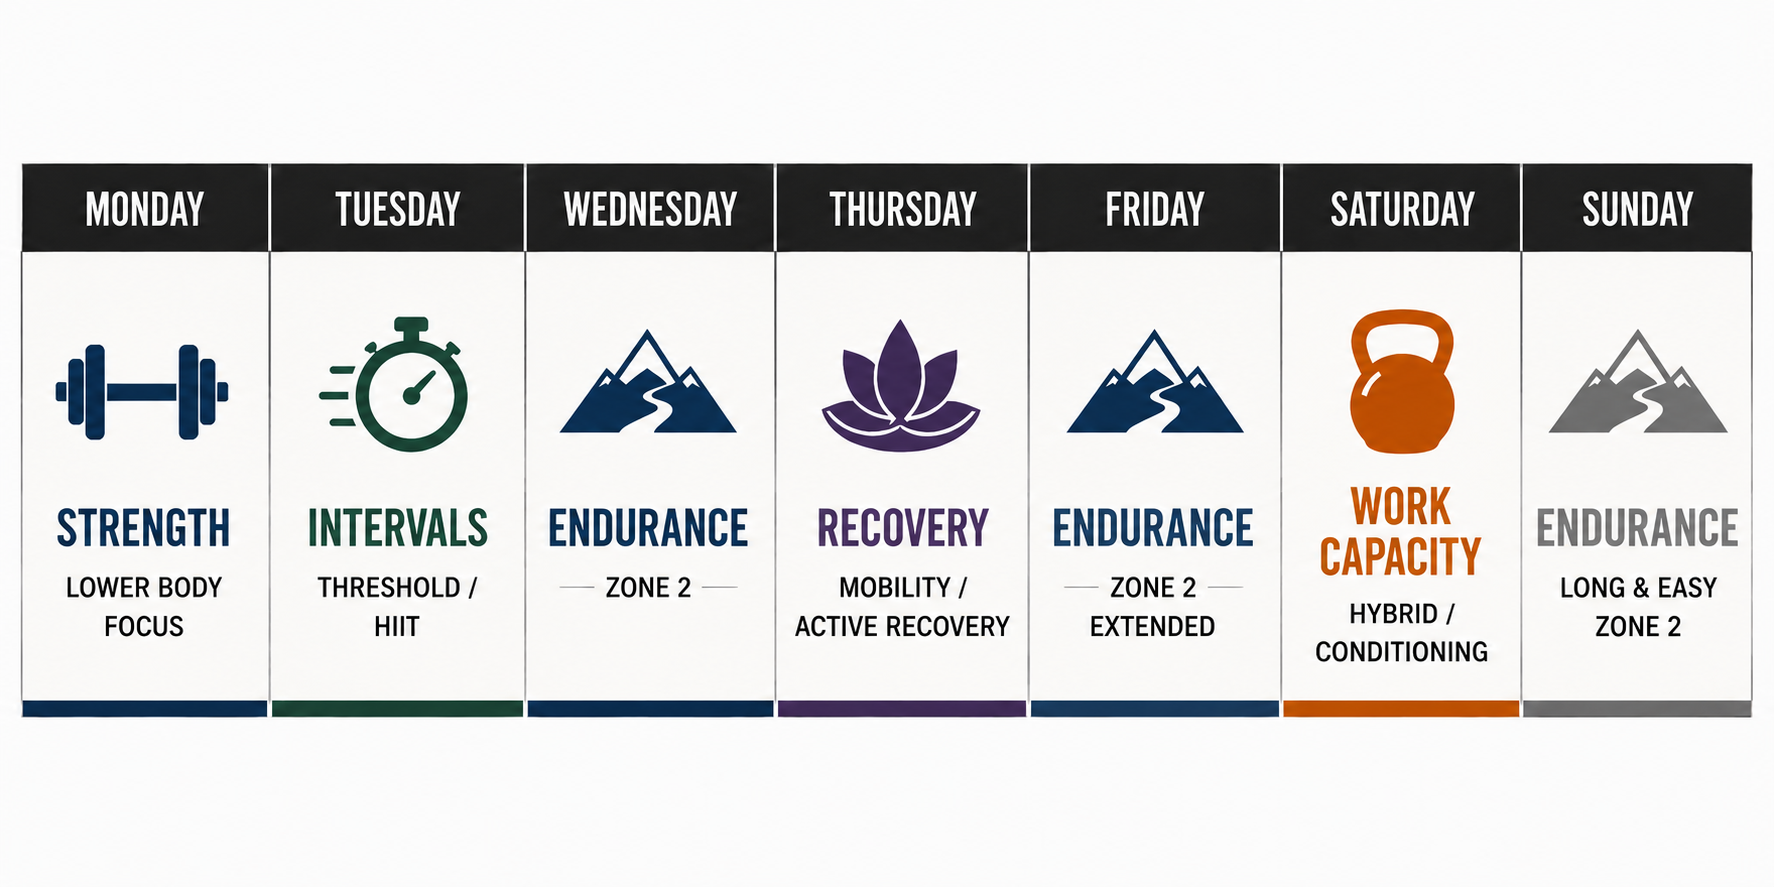
This is effectively the same week as our baseline template, but with a bias towards endurance. Note that we still consolidate our stressors in accordance with Step 3.
What if, on the other hand, we have an athlete who needs to bias strength work a bit more while still keeping touches on endurance? You can probably imagine where this is going to go, but I’ll provide a visual anyway…
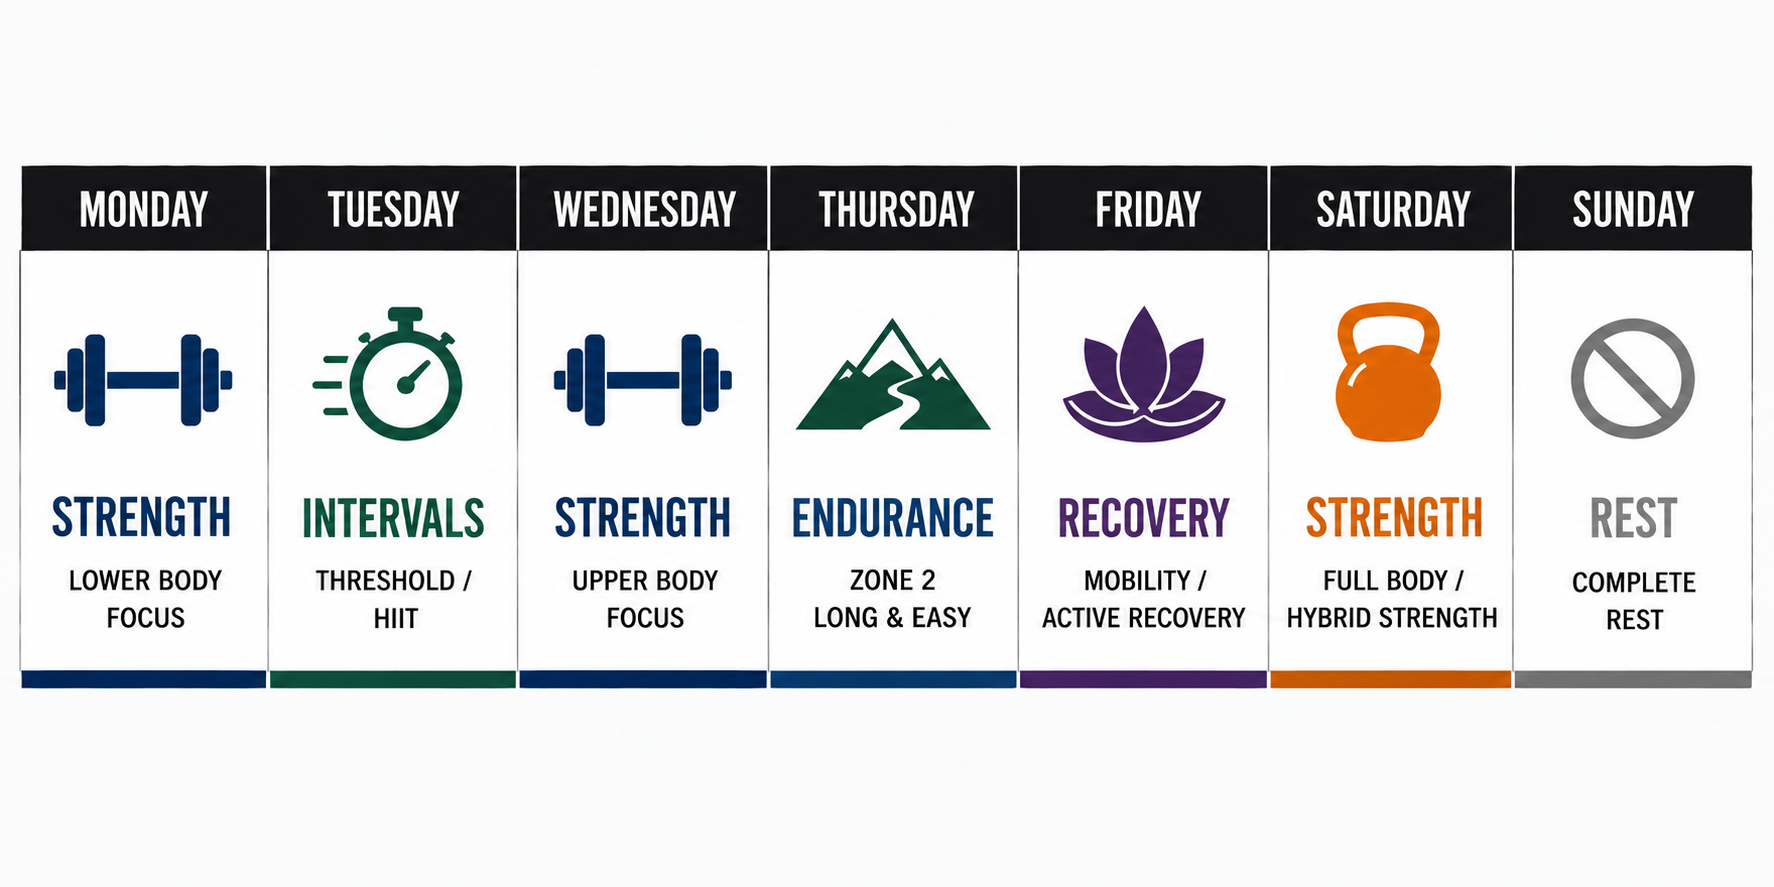
This should be obvious, but there are layers to this. To keep things simple, I’m only dealing with straightforward training weeks that have one training session per day. When the situation demands it, we can add two-a-days, split long volume work across the entire weekend, add in non-traditional modalities (swimming, cycling, etc) or get all kinds of crazy with it.
The takeaway points, at this stage in the process, are these:
We’re designing a training template based on the NEEDS OF THE ATHLETE and THE DEMANDS OF THE CALENDAR
We’re creating an initialphase (a week, in this case) that will serve as our first batch of stressors
Once either the athlete or the calendar demands it, we will design a new phase.
We are not projecting training into the future, as you would in a traditional periodization model.
Step 5: Building the Sessions
For demonstration purposes, I’m not going to build every single training session for the weekly template. Instead, I’ll dive a bit deeper into the first strength session of the week just to give you a flavor for how the sausage is made. In future posts, we’ll probably go even deeper into strength sessions versus power sessions versus endurance sessions, etc. If you’re curious, we’ve kind of already done that with work capacity here.
For no real reason at all other than personal preference, I tend to think of my strength sessions as occurring in four parts:
Warm Up/Prep
Main Lift + Mobility
Secondary Lifts
Core/Accessory OR Work Capacity OR Supplemental Endurance OR…
Warm Up/Prep
No need to get complicated here. Base your warm-up movements on whatever primary movement you’re going to hit for the day. If it’s legs, I like to spend time in a “third world squat” for 5-10 minutes and then proceed to 2-3 rounds of lunges, box jumps, etc. I find that warm-ups are very much a personal preference thing, and serve as much to get your mind right as your body. Athletes that have worked with me for a long time are generally capable of just building their own warm-up with no issue.
One piece I’ll add to this (because I’ve been experimenting with it lately): breath-based cardio. Almost every athlete you meet will spend 5-10 minutes doing some kind of cardio movement prior to beginning the warm-up. I’ve found this to be an excellent time to introduce some intentional breathing work. For example, I might do an easy spin on the stationary bike for 5 minutes while focusing on a 4-second nasal inhale followed by a 6-second exhale.
Main Lift + Mobility
Long ago I started supersetting mobility work with my main lift. I think I arrived at this conclusion after realizing that, if saved until the end of the session, mobility work often gets skipped. The other nice thing about supersetting mobility work is that it “forces” the athlete to rest between sets. I don’t always do this, but out of every 10 prescriptions that I write, I’d say probably 8-9 of them follow this format. For example…
Back Squat + Hip Flexor Stretch.
Another interesting quirk with my programming is that I program in rounds versus sets. This is a relic of my CrossFit days and my time as a young strength coach working with pararescue. I noticed that when prescribing sets, the guys would just go through them. When prescribing rounds, the guys would actually work through them. It’s a subtle psychological trick, but it made enough of an impression that I’ve just kept doing it. Sets and Rounds are literally the same thing; it’s just that people react to them differently. Fair enough. So now we’re here…
Three Rounds
Back Squat
:30s Hip Flexor/side
Ok bear with me, because it’s about to get weird.
IN ORDER FOR A “NON-PERIODIZED, EMERGENT PROGRAM TO WORK, YOUR PRESCRIPTIONS HAVE TO PROVIDE FEEDBACK
This is so critical it probably deserves its own future content block. Because we’re prescribing training a week at a time, we have to know how the athlete is responding (subjectively and objectively) such that we can then use those responses to derive the next week’s training scheme.
For strength work, there are two primary tools that I use:
Rep Ranges
Autoregulation (RPE or RIR)
Together, these two tools create a “double progression” model that I’ll unpack in a second. But first:
Rep Ranges. This is no more complicated than just providing a floor and a ceiling. For example, 3-5 reps. This tells the athlete that instead of trying to nail a single rep, they can navigate within constraints.
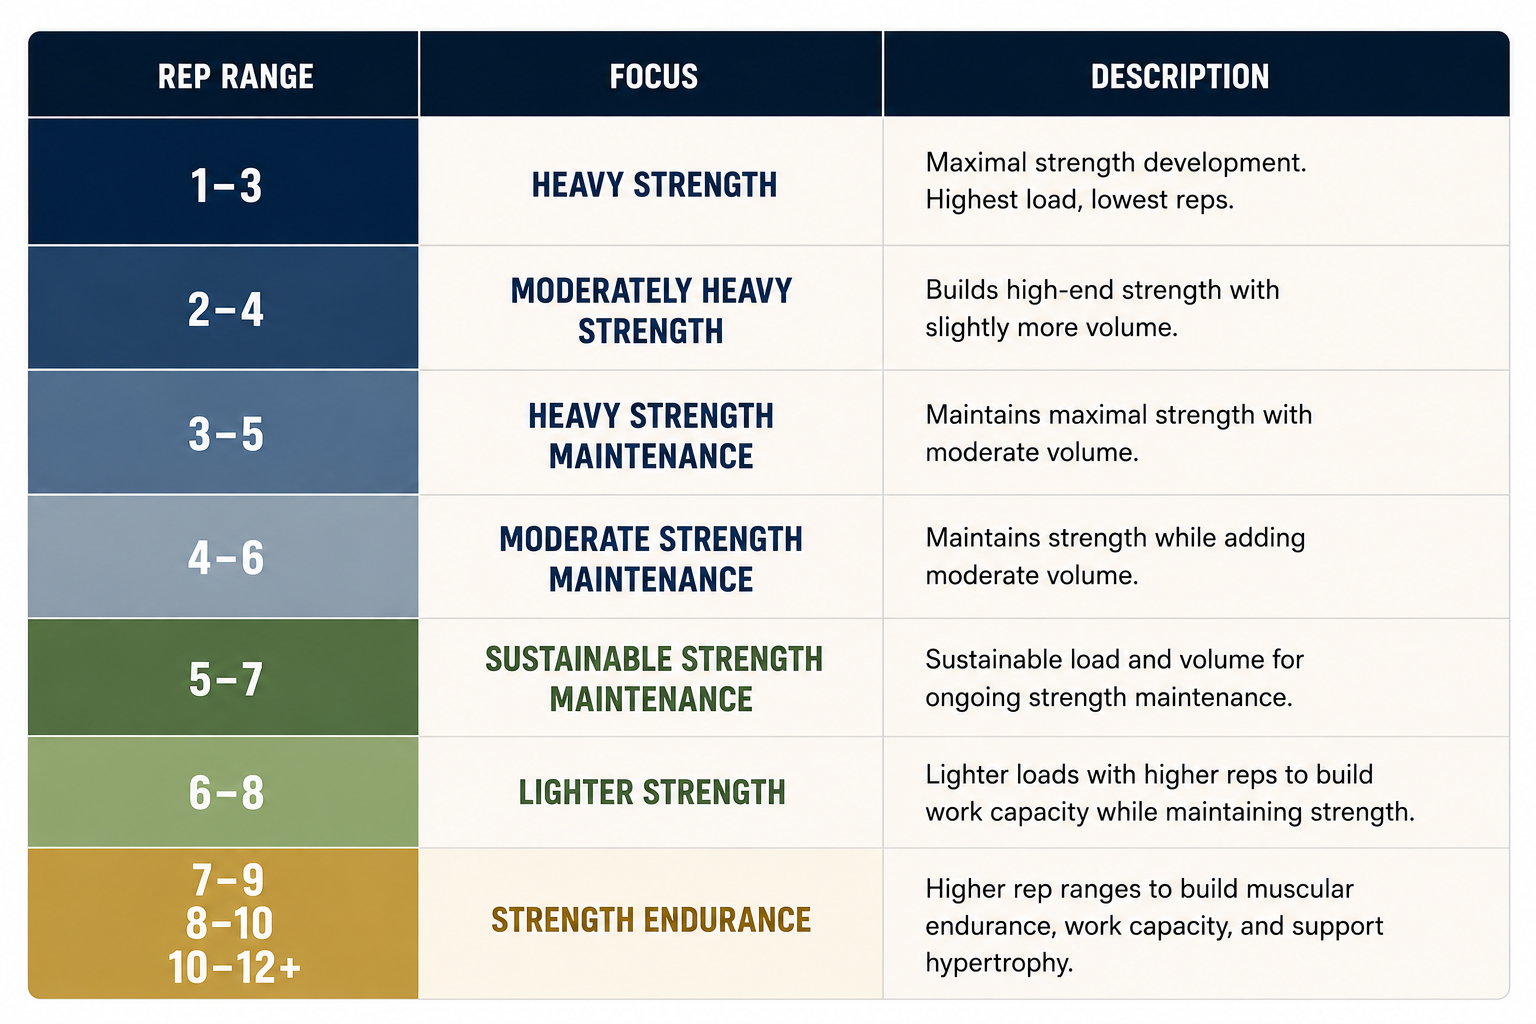
These are, again, guidelines as opposed to strict laws. Different athletes may respond to these ranges in different ways. The point is that instead of trying to force a specific singular rep, we’re allowing the athlete to aim for a slightly broader target.
Generally speaking, any programming decision that turns over more decision-making authority to the athlete is one that I’m going to be in favor of.
Autoregulation (RPE/RIR). Rate of Perceived Exertion is nothing more than a subjective level of effort assigned to a particular prescription, oftentimes on a 1-10 scale (10 being maximal effort). The inverse of that model, Reps in Reserve, does the same thing but prescribes a certain number of “reps in the tank,” so to speak. So an RPE of 8 might correspond with an RIR of 2 (“I could have done two more reps at this weight”). I use both of these interchangeably, but I’ve found that for most people RIR makes intuitive sense much quicker than RPE.
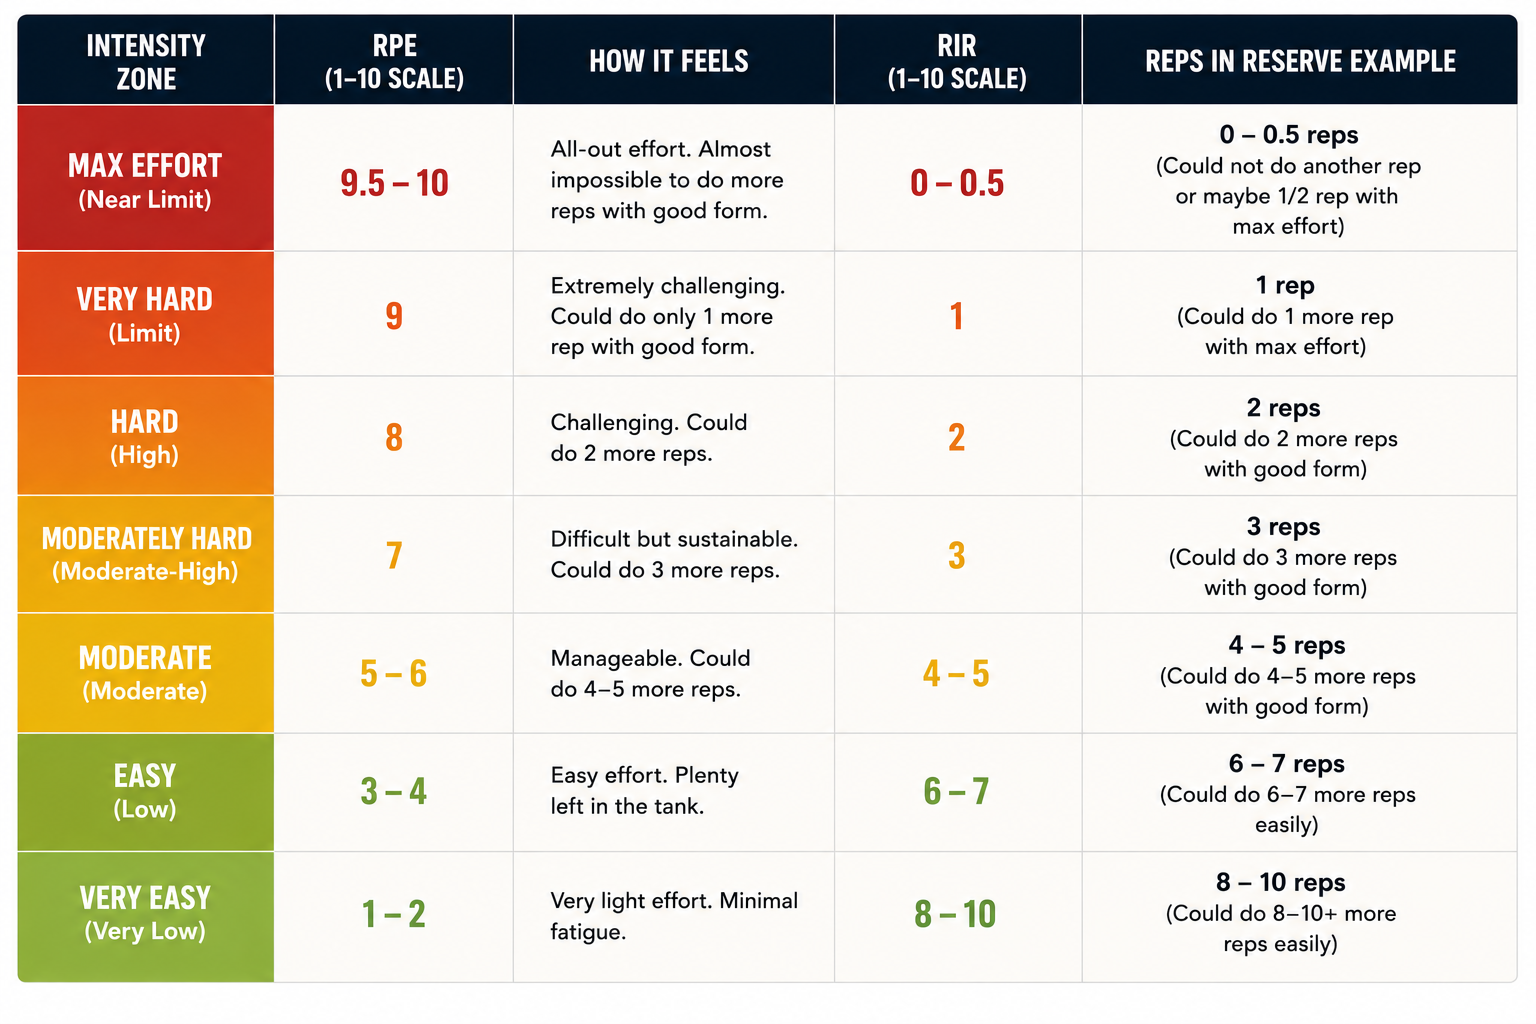
When we combine REP RANGES and RPE/RIR, we set the conditions for DOUBLE PROGRESSION
We now have a critical feedback loop that we can use to derive future training: where an athlete fell in the rep range and at what difficulty.
For example, if I prescribe the following:
3 Rounds
Back Squat x3-5 @ 2RIR
:30s Hip Flexor Stretch
And the athlete performs the following back squat efforts:
RD1: 5× 300lb @ 2 RIR
RD2: 5× 300lb @ 2 RIR
RD3: 3× 300lb @ 2RIR
Then I know that on that third round, fatigue was starting to set in and that 300lb effort was quite a bit harder than the first two rounds. Given that the athlete still has room to maneuver within this particular prescription, I know that for the next week of training I can keep it at 3-5 @ 2RIR.
Let’s say that the next exposure (a week later) looks like this:
RD1: 5× 300lb @ 2 RIR
RD2: 5× 300lb @ 2 RIR
RD3: 4× 300lb @ 2RIR
What does this tell me? If the answer was “the athlete is stronger than they were a week ago,” then you are correct. From here, I can either repeat this prescription again (to see if they hit 5 reps on all three sets), OR I can make the coaching decision to adjust the prescription entirely based on my timeline and my athlete’s goals.
This is markedly different than giving an athlete a single rep and a defined percentage weeks in advance and expecting them to nail it exactly. Creating a program that calls for 3×5 @ 85% 1RM six weeks from now is asking a lot of the athlete, and takes absolutely nothing into consideration with regard to their readiness or rate of adaptation leading up to that session.
Secondary Lifts
The secondary lifts are kind of a “dealer’s choice” based on an endless list of factors. A few things that I think through are as follows:
Athlete Preference: you can have a lot of fun here, choosing exercises that support the main lift but are also preferred by the athlete
Areas of Weakness: if you notice that hamstring or glute weakness is what’s holding back the athlete’s squat, this is a perfect place to prescribe targeted accessory work that will shore up those weaknesses
Opposite Split: if I’m biasing endurance for a phase at the expense of a full strength day, I might relegate some of that bygone strength day’s emphases to this part of the training session. For example, if I need to hit lower AND upper body work in the same session, I might hit the lower body effort as the primary movement and include some supplemental upper body work here.
You and your athletes will have your own reasons for including certain things, so use my thought processes as mere guidelines.
I’ll also quickly note that for my secondary lifts, I’m still using that double progression model we just explored.
So with all that being said, here’s where we’re at with our session:
A) 3 Rounds
Back Squat x3-5 @ 2RIR
Hip Flexor Stretch x :30s/side
B) 3 Rounds
DB Romanian DL x8-10 @ 1RIR
Goblet Reverse Lunge x8-10/side @ 1RIR
Pigeon Stretch x :30s/side
I’ve made a few choices here that you don’t have to make. First, I’m including three movements on Part B. You do not have to do that. I’ve also decided to make one of those movements another mobility movement. Again, you don’t have to do that.
In some programs, I might have that third movement be a loaded carry. Conversely, if I’m trying to get some additional Zone 2 work in for my athlete and I know the upcoming Part C will be 20 minutes of steady state work, I might put a core (“abs”) movement in Part B just to check all of my boxes for the day. I’m less concerned with how you build out your particular session and more interested in you understanding the “why” behind the construction.
Core/Accessory OR Work Capacity OR Endurance Or…
The last part of the session is really a wildcard based on what you need to emphasize. I’ll run through a few scenarios for you.
“My athlete needs more endurance work”: in this case, I might forego bodybuilding/metcon/fun and instead put a Zone 2 piece here (20-30 minutes or so). Oftentimes I’ll make this non-impact unless there’s a compelling reason not to.
“My athlete needs to get faster”: this is a common one for me, especially on lower body strength days. I’ll prescribe something like “10 rounds of 1:00 fast + 1:00 walk” to get some introductory speed work in. This type of prescription also helps to prepare an athlete for an upcoming phase that might bias more towards a full day of speed work or faster running
“My athlete wants to get big”: in this case, Part C almost becomes an extension of Part B in the sense that we’re hitting several accessory exercises (usually bodybuilding stuff) at higher rep ranges and higher RPEs. Classic pump session stuff.
“My athlete likes CrossFit”: ah yes…a common one. Part C becomes a short little metcon in the classic “CrossFit class” fashion. If you have no idea what I’m talking about, it’s the quintessential Strength + Metcon structure that you’ve probably done before
“My athlete needs more core work”: this is probably my favorite, and one that comes up a lot with Long and Strong. Part C becomes an elegant couplet or triplet that includes isometric or functional core work coupled with heavy carries of some sort. For a lot of athletes, this “feels” like a metcon without actually creating so much intensity that they’re on the floor at the end of it.
To show what a full session might look like, let’s assume we’re working off of #5.
A) 3 Rounds
Back Squat x3-5 @ 2RIR
Hip Flexor Stretch x :30s/side
B) 3 Rounds
DB Romanian DL x8-10 @ 1RIR
Goblet Reverse Lunge x8-10/side @ 1RIR
Pigeon Stretch x :30s/side
C) 12 min @ sustainable pace:
10x Slasher-to-Halo/side @ 16kg
:30s Static Hang
50yd Farmer’s Carry
A few last-minute notes here. Notice that on C I switched from a “rounds” prescription to a “time” prescription. Again, this is largely to keep athletes engaged, but it also serves the purpose of creating yet another feedback loop. If, at a sustainable pace, they’re able to complete 4 rounds of the “circuit,” then I know what to watch for in future versions of this same prescription.
Progression
Alright…this is the bread and butter. Now that we know roughly how to build a session, the question becomes “how do we progress it as the athlete adapts?”
Before we unpack that, let’s explore a few critical points:
We progress our sessions only insofar as the athlete’s signaling tells us they’re ready for it
We do not try to predict the future beyond the phase that’s in front of us. The athlete’s response to each training session and each training phase tells us how aggressive or conservative we need to be
This is the key piece in our periodization debate. We are navigating athlete response in real time. We are NOT laying out 12 weeks of training and trying to force our athlete into prescriptions simply because we’ve already written them down
It’s ok to not change anything. When you use constraints (autoregulation, rep ranges, etc), you can allow the athlete to simply exist within that prescription for as long as they need to, or as long as you want them to. This is the answer to the question of “how do you progress an athlete without periodization??”
We’re mapping all of this to the calendar. A frequent rub in my periodization debate is the assumption that, without forecasting, we can’t account for specific days on the calendar. This is untrue. We always have an eye towards where we’re going; we just adjust or skew our constraints more aggressively or conservatively based on where we need to be.
How Progressive Overload Actually Works
It’s probably worth quickly taking a knee to touch on how to properly understand progressive overload. The traditional “Milo and the Bull” model of progressive overload states that as the bull that Milo was carrying every day got bigger, Milo himself got stronger. The direction of causality is important here: the myth implies that it’s the added weight of the bull that drives the strength of Milo. In modern terms, this is the idea that we can drive progressive overload by increasing the weight on the bar from one week to the next.
This is incorrect.
Progressive overload actually works in the opposite direction. As Milo gained strength, he was able to lift what was ultimately a progressively heavier, growing bull. This implies that it isn’t the added weight on the bar that forces adaptation; rather, it’s the adaptation the athlete experiences that allows for more weight to be added to the bar as a result of that adaptation.
Don’t feel bad if you need to read that a few times to understand the point. I had to do the same thing. Once you realize the implications, however, it opens up an entirely new perspective on training.
First and foremost, we don’t need to add weight every week. We also don’t need to change the prescription every week. In fact, it may take an athlete several weeks to adapt to the same prescription, and if we try to force that adaptation with a misaligned understanding of progressive overload, we run the risks of injury, burnout, etc., that seem so common in this field.
Once you combine this understanding with the earlier explanation of constraints-based programming, the way to move an athlete from one phase to the next should become very straightforward:
Apply the constraints, watch the athlete’s response, adjust training only when the adaptation has occurred.
The graph below shows how this works over time.
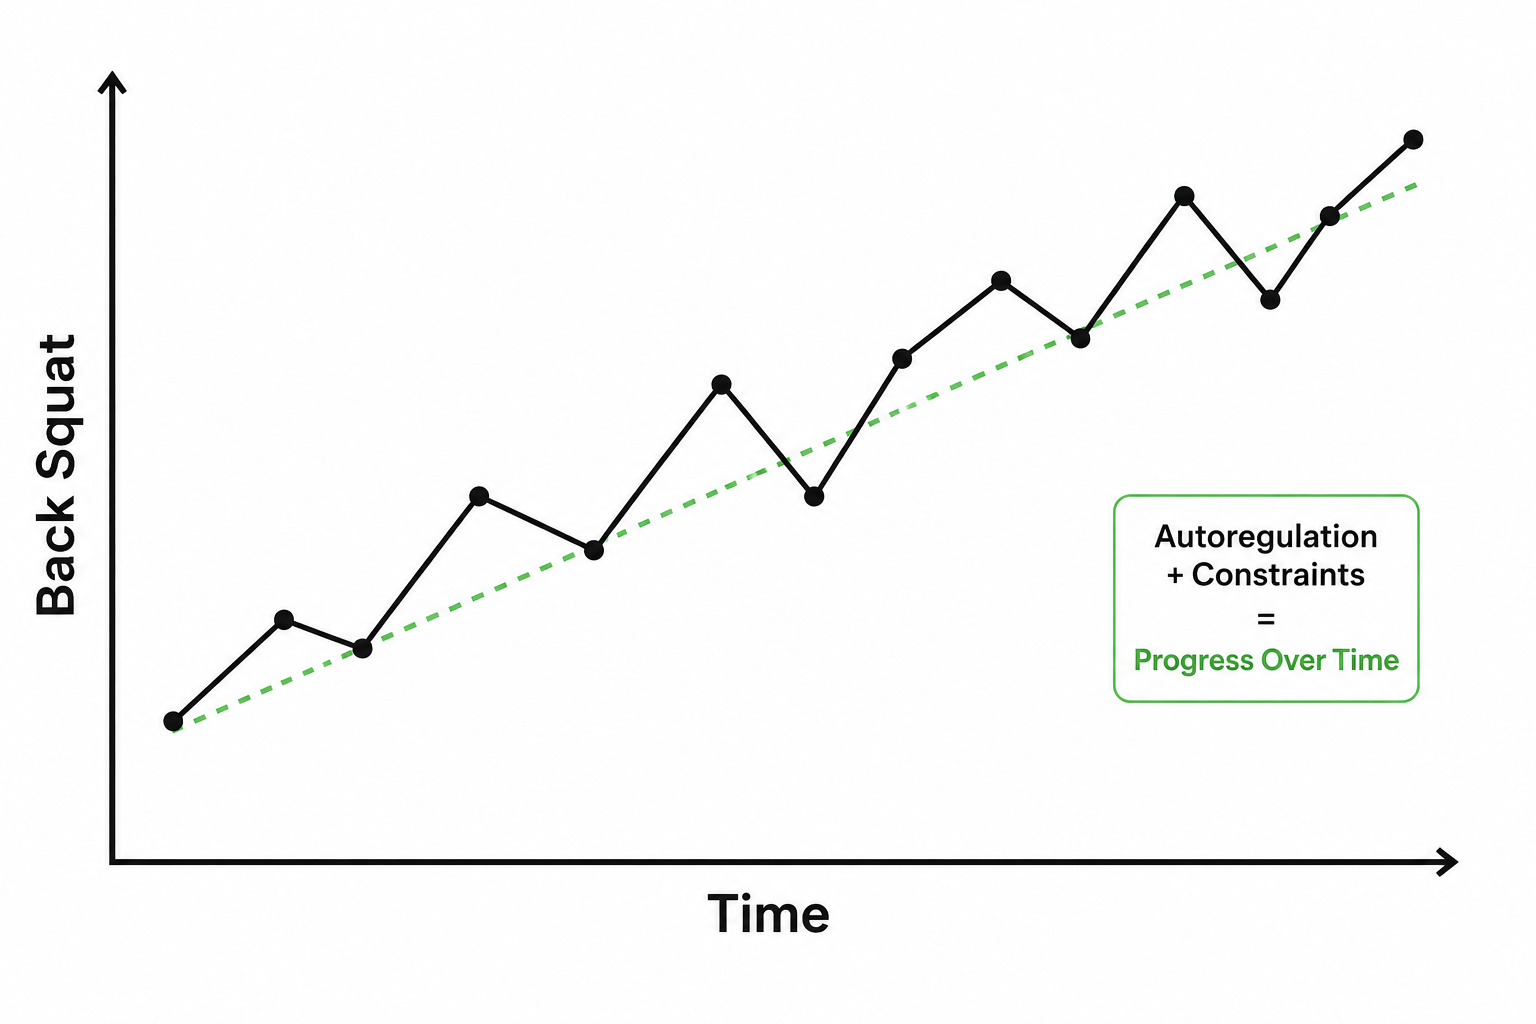
When you start to understand how adaptation actually occurs, you begin to realize that progression is not a linear process. Athletes don’t move along a nice, predetermined line that maps beautifully to 2.5-5% increases in %1RM from one week to the next. In fact, on any given week, due to myriad factors, the athlete’s performance might actually dip relative to the week before. That is completely fine and should honestly be expected. It’s the trend over time that we’re most interested in, and so long as that’s moving in the right direction, then we’re on the march towards our goals.
A Practical Example
In an effort to make things as practical as possible, let’s revisit our earlier back squat prescription.
I should also add a quick disclaimer: this example is of a fake athlete lifting fake numbers at fake RPEs. This is going to look different for everyone because, well, we’re all human.
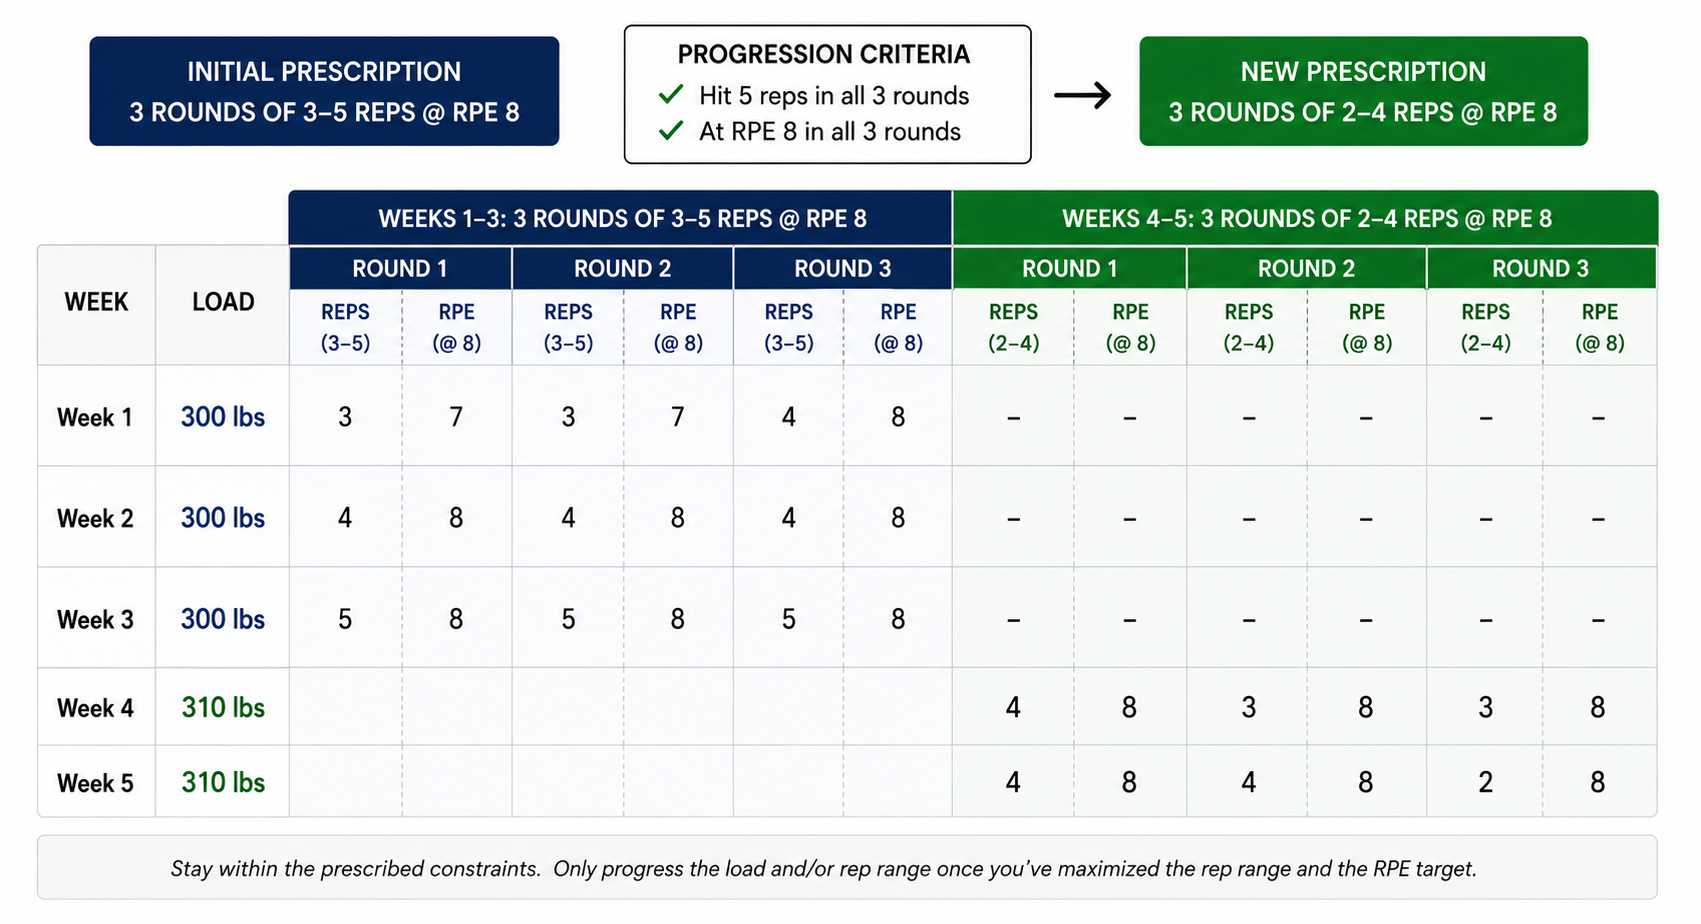
In the first week, the athlete was at the lower end of the rep range and stayed under the RPE 8 intensity constraint. This gives us a bit of a baseline and tells us that there is plenty of room within the initial set of constraints for the athlete to improve.
This also tells us that we don’t need to make any changes at all for the second week, because the athlete hasn’t completely adapted to the prescription yet. Patience, grasshopper.
On Week 2 (our second exposure), you can see that we’re moving the weight for a few more reps, but our RPE has also gone up on a set-by-set basis. This is good…we’re pushing things a bit.
Week 3 is where our athlete shows us that they’ve maximized the adaptation. All three sets are at the high end of the rep range, and RPE hasn’t been exceeded.
Note that we have a few options at this point heading into Week 4:
First, we could keep the same 3-5 @ RPE 8 prescription and just encourage the athlete to lift a heavier weight
Alternatively, if we have an “absolute strength” goal that we need to work towards, we can adjust the constraints to take the athlete into lower rep ranges and, subsequently, higher levels of intensity.
How aggressive or conservative you are with your progression strategy depends on how distant your athlete’s goal is on the calendar and how far away they are, performance-wise, from that goal.
If we want to be more conservative, we can widen our rep ranges and/or lower our RPEs
Another more conservative strategy would be to rotate in new movements more frequently
A more aggressive strategy would use tighter rep ranges and/or higher RPEs depending on the ultimate goal
When my athletes are just cruising along, with no goal on the calendar and no real need to maximize anything, we can play fast and loose with training. In these instances, compliance and enjoyment are generally our only two priorities. This does not mean that we’re doing random stuff every single day; rather, we’re exploring different movement patterns and session structures to tease out what works, what’s enjoyable, and what we might revisit later on with a tighter set of constraints to really drive progress when we need to.
This approach is pretty commonly known as Pulling the Floor, versus Pushing the Ceiling. Most training programs out there, whether they realize it or not, are pretty constantly pushing the ceiling…
Closing Thoughts
Admittedly, this was a massive project to undertake. Normally I sit down and write in one sitting. This article, on the other hand, has taken me several weeks. When you try to be transparent about every little step you take while programming for an athlete, you very quickly realize that each one of those macro steps consists of myriad micro steps and thought patterns that ultimately become too enmeshed to cleanly articulate in a single post. That said, one of my pet peeves in this industry is coaches claiming to have some sort of proprietary secret that you can only access if you subscribe to their platform or buy their e-book. Sure, we sell you stuff at MOPs and MOEs, but literally all of our programming philosophy is derived from the steps I’ve just laid out for you in this article.
You don’t need us, but you’re more than welcome to come along for the ride if you’d like to turn your approach over to a team that can make it work exclusively for you.
I don’t want to just bash traditional training models on the internet and not back that up with concrete examples of how to do something different. It’s one thing to debate semantics and philosophy, but it’s another thing entirely to present a pragmatic example of how to actually apply the counterargument.
And that’s just it…I’ve been programming this way for over 12 years with quite a bit of success. I don’t mean success for me, but for the athletes that I have worked with. Successful Tier 1 selections, passing basic military PT tests, crushing high-level domestic and international law enforcement standards, or just existing indefinitely as a lethal human. Most athletes that work with me tend to stay for a long, long time…not because I’m any kind of wizard, but because this style of programming promotes an infinite versus a finite approach to fitness. We aren’t arbitrarily stacking one program on top of the next; we’re building out structured approaches to training that continuously map onto your specific rate of adaptation across time, interests, and objectives.
Now, having read this article, I don’t expect you to all of a sudden be an expert in programming this way. For the sake of explanation, I’ve had to limit the examples that I’ve provided and the endless variations to this approach that we might need to exercise, depending on the athlete in front of us.
What I do hope you take away from this whole experience is an understanding that there are other training approaches out there. You don’t need to limit yourself to Block or Linear or Undulating or West Side or Whatever Else You Find Online. Setting up a single phase, building constraints, executing training sessions, and using both objective and subjective feedback to drive progression is a completely appropriate and highly effective way to approach training. Have fun with it. Recognize that for most athletes, training need be no more complicated than “do what you enjoy for as long as you enjoy it, and adjust things after they stop working as well.”
I’ll likely revisit this article multiple times in the future. I’m also planning to write several spin-off pieces based on areas we may have only touched on that are worthy of deeper explanation.
And, finally, for the sake of transparency…if you have any questions at all or want feedback on your own program design, reach out to us.
Enjoy the ride. We’ll be here to help guide you along the way.